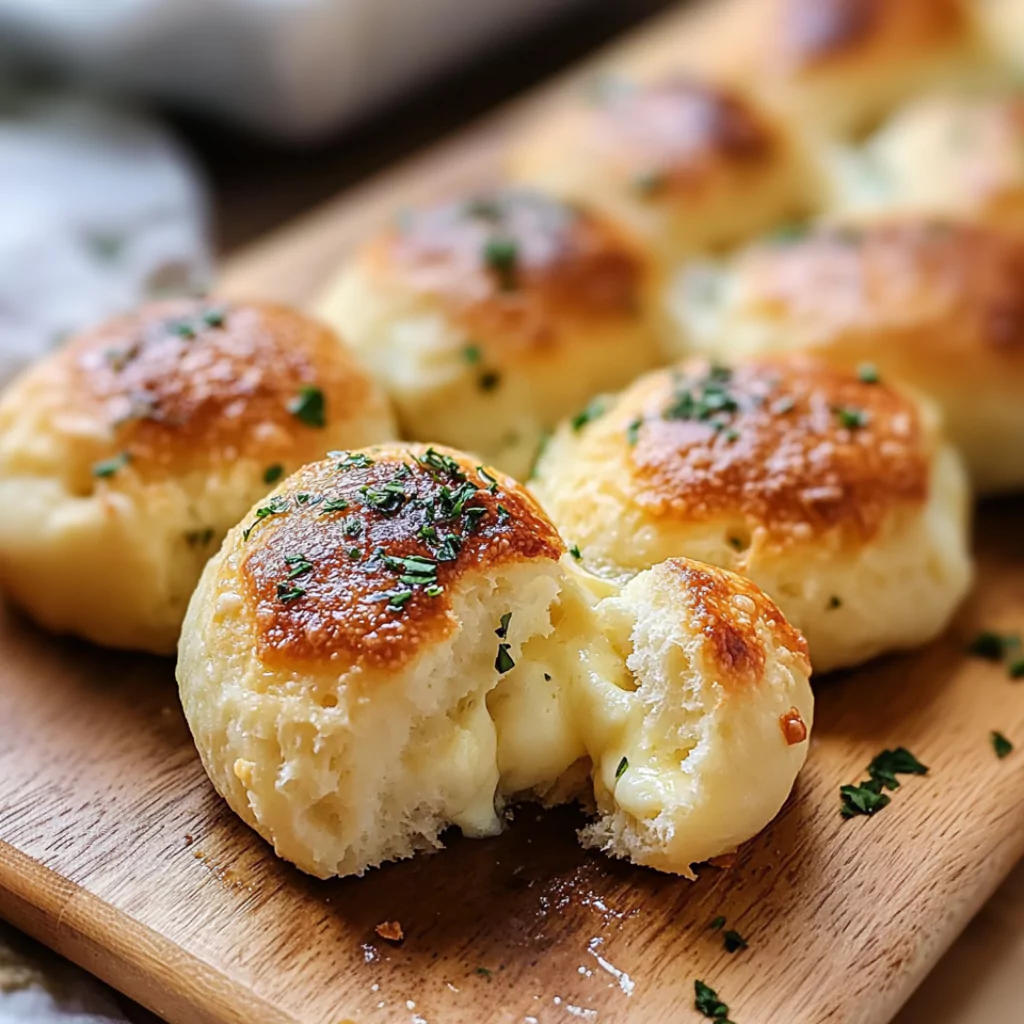
Imagine biting into a golden, buttery biscuit, only to be met with an explosion of gooey, melty mozzarella cheese. That’s the magic of gooey mozzarella biscuit bombs—a bite-sized, cheese-filled delight that’s crispy on the outside, soft on the inside, and bursting with cheesy goodness.

These little snacks are perfect for any occasion, from game nights and family gatherings to casual snacking. They take classic biscuits to the next level, transforming them into irresistible, pull-apart bites that are as fun to make as they are to eat.
What makes mozzarella biscuit bombs so popular? Their ease of preparation, customizable fillings, and universal appeal. Whether served as an appetizer, a side dish, or even a quick meal, these cheesy biscuit bombs satisfy cravings effortlessly.
History and Cultural Significance of Cheese-Stuffed Bread
Cheese-stuffed bread has been a favorite across cultures for centuries. From Italian calzones and garlic knots to Middle Eastern cheese-stuffed flatbreads, the idea of encasing cheese in dough is nothing new.
- Italy: Mozzarella-stuffed breadsticks, focaccia, and panzerotti are traditional ways Italians incorporate gooey cheese into baked goods.
- Middle East: Manakish and khachapuri, both cheese-filled breads, are popular breakfast and street food items.
- United States: Stuffed crust pizza, garlic knots, and pull-apart cheese bread have skyrocketed in popularity in recent decades, largely due to the rise of casual dining and takeout culture.
The modern mozzarella biscuit bomb takes inspiration from these international classics but simplifies the process using pre-made biscuit dough, making it accessible to home cooks of all skill levels.
Preparation Phase & Tools to Use
Before diving into making mozzarella biscuit bombs, it’s essential to have the right tools and ingredients. This ensures a seamless cooking experience and perfect results every time.
Essential Tools and Equipment
- Baking Sheet or Cast Iron Skillet – Ensures even baking and a crispy exterior.
- Pastry Brush – Useful for applying a garlic butter glaze to enhance flavor.
- Sharp Knife or Dough Cutter – Helps with cutting and shaping biscuit dough.
- Cheese Grater – If using a block of mozzarella, a grater makes shredding easier.
- Mixing Bowls – For preparing seasoning mixes and glazes.
- Measuring Spoons and Cups – Ensures accurate seasoning and butter ratios.
Importance of Each Tool
- A cast iron skillet provides a crispy, golden crust while evenly distributing heat.
- A pastry brush allows for precise application of garlic butter, enhancing flavor without overloading the dough.
- A sharp knife or pizza cutter helps divide dough portions uniformly, preventing uneven baking.
- A cheese grater allows for fresh mozzarella, which melts better than pre-shredded versions.
Ingredients List
Dough Options
- Pre-made biscuit dough – The easiest option for quick preparation.
- Homemade biscuit dough – A mix of flour, baking powder, butter, and milk for a flakier texture.
- Crescent roll dough alternative – Lighter and slightly sweeter than biscuit dough.
Cheese Options
- Mozzarella cheese – The classic choice for the ultimate gooey stretch.
- Cheddar or provolone – Adds more depth of flavor to each bite.
- Dairy-free cheese alternatives – Perfect for those with dietary restrictions.
Seasonings & Flavor Enhancers
- Garlic powder – A must for extra savory flavor.
- Italian seasoning – A blend of oregano, basil, and thyme to enhance the taste.
- Parmesan cheese – Sprinkled on top for extra richness.
- Red pepper flakes – Optional for a little heat.
- Butter or olive oil – Used for brushing on top before baking.
Step-by-Step Cooking Instructions
Step 1: Preparing the Dough
- Preheat your oven to 375°F (190°C). If using an air fryer, set it to 360°F (182°C).
- If using pre-made biscuit dough, separate each biscuit from the can and flatten slightly.
- If using homemade dough, roll it out and cut into 2-3 inch rounds.
Step 2: Stuffing the Biscuits
- Cut mozzarella into small cubes (or use string cheese pieces for uniform stuffing).
- Place a cube of cheese in the center of each dough round.
- Carefully fold the edges up and pinch to seal completely.
- Roll the dough ball gently between your hands to ensure a tight seal.
Step 3: Baking the Mozzarella Biscuit Bombs
- Arrange biscuit bombs seam-side down on a lined baking sheet or in a cast iron skillet.
- Brush the tops with melted butter or olive oil for a golden crust.
- Bake for 12-15 minutes until golden brown and puffed.
Step 4: Adding the Final Touches
- Melt 2 tablespoons of butter and mix with garlic powder and Italian seasoning.
- Brush the hot biscuit bombs with the butter mixture immediately after baking.
- Sprinkle with Parmesan cheese and red pepper flakes if desired.
Step 5: Cooling and Serving
- Let the biscuit bombs cool for about 5 minutes before serving.
- Serve warm with marinara sauce, garlic aioli, or spicy sriracha mayo for dipping.
Best Side Dish Recommendations
Gooey mozzarella biscuit bombs are delicious on their own, but pairing them with complementary side dishes and dipping sauces takes them to the next level. Whether you’re looking for something fresh, creamy, spicy, or tangy, here are some of the best pairings to serve with these cheesy bites.
Classic Dipping Sauces
- Marinara Sauce – A tangy and slightly sweet tomato-based sauce balances the richness of the cheese.
- Garlic Butter Dip – Melted butter infused with garlic and parsley for an extra layer of flavor.
- Ranch Dressing – The cool creaminess of ranch complements the warm, gooey cheese.
- Spicy Sriracha Mayo – A bold and spicy option for those who love a kick of heat.
- Honey Mustard Sauce – A sweet and tangy sauce that pairs surprisingly well with cheese.
- Balsamic Glaze – A drizzle of balsamic reduction adds depth and a slightly sweet acidity.
Complementary Side Dishes
- Italian Chopped Salad – A fresh mix of lettuce, tomatoes, olives, and Parmesan tossed in a zesty vinaigrette.
- Creamy Tomato Soup – A warm and comforting soup that enhances the cheesiness of the biscuit bombs.
- Roasted Brussels Sprouts – A crispy and slightly bitter contrast to the rich, buttery dough.
- Crispy Green Bean Fries – A crunchy and nutritious alternative to French fries.
- Cheesy Mashed Potatoes – Creamy and loaded with cheese for a double-dose of indulgence.
- Cold Pasta Salad – A refreshing and tangy side dish that balances the richness of the biscuit bombs.
- Sweet Hawaiian Crockpot Chicken – A savory-sweet protein dish that adds variety to the meal.
- Air-Fried Carrot Fries – A slightly sweet and crispy side that pairs well with garlic butter flavors.
Nutritional Information & Health Benefits
While gooey mozzarella biscuit bombs are undeniably indulgent, they can be enjoyed in moderation as part of a balanced diet. Understanding their nutritional breakdown and how to modify the recipe for different dietary needs can help make them a more versatile treat.
Calories & Macronutrient Breakdown
- A typical mozzarella biscuit bomb contains a combination of carbohydrates from the biscuit dough, fat from the butter and cheese, and protein from the mozzarella.
- Depending on portion size and ingredients used, each biscuit bomb can range from 180-220 calories per serving.
Healthier Modifications
- Lower-Calorie Options – Use reduced-fat cheese, whole wheat biscuit dough, or smaller portions.
- Gluten-Free Alternative – Substitute with gluten-free biscuit dough or almond flour-based dough.
- Dairy-Free Option – Use plant-based cheese and butter substitutes.
- Lower Sodium – Reduce added salt and opt for low-sodium cheese.
- More Protein – Mix in shredded chicken or turkey inside for extra protein.
Nutritional Benefits
- Calcium-Rich – Mozzarella is a great source of calcium, supporting bone health.
- Protein-Packed – Cheese provides protein for muscle maintenance.
- Customizable for Dietary Needs – Can be adjusted for gluten-free, keto, and dairy-free diets.
Common Mistakes & Recipe Hacks
Even with a simple recipe, certain mistakes can affect the texture and flavor of mozzarella biscuit bombs. Here are the most common errors and how to avoid them, along with expert tips for making them even better.
Mistakes to Avoid
- Overstuffing the Dough – Too much cheese can cause the biscuits to burst open during baking.
- Not Sealing the Edges Properly – Leaving gaps can cause cheese leakage, leading to a mess on the baking sheet.
- Skipping the Butter Glaze – The buttery finish enhances flavor and prevents dryness.
- Baking at the Wrong Temperature – Too high can burn the exterior before the cheese melts, too low can make them dense.
- Using Pre-Shredded Cheese – Fresh mozzarella melts better and provides a gooier texture.
Expert Hacks for the Best Biscuit Bombs
- Use String Cheese for Easy Stuffing – Pre-cut pieces help ensure even cheese distribution.
- Brush with Egg Wash for a Golden Crust – This creates a more bakery-style finish.
- Try Different Fillings – Add pepperoni, jalapeños, or bacon bits for variety.
- Use an Air Fryer for Extra Crispiness – Air frying at 360°F ensures a crispy outside with a soft, gooey center.
- Drizzle with Honey for a Sweet-Savory Twist – A light honey drizzle adds a unique flavor profile.
Storing and Reheating
Mozzarella biscuit bombs are best enjoyed fresh out of the oven, but if you have leftovers, proper storage and reheating methods can help maintain their texture and flavor.
How to Store Leftovers
- Refrigeration: Place cooled biscuit bombs in an airtight container and store in the refrigerator for up to 4 days.
- Freezing: Arrange biscuit bombs on a baking sheet and freeze for 1 hour before transferring them to a freezer-safe bag. They can be stored for up to 3 months.
- Preventing Sogginess: To keep biscuit bombs from becoming too soft, store them with a paper towel inside the container to absorb excess moisture.
Best Ways to Reheat
- Oven Method (Best for Crispiness): Preheat oven to 350°F and bake for 8-10 minutes until warm and crispy.
- Air Fryer Method: Heat at 360°F for 5-6 minutes to restore the crunchy exterior.
- Microwave (Quickest but Softest Result): Heat in 15-second intervals until the cheese is melted.
- Toaster Oven: A great alternative to keep them from getting soggy while maintaining crispness.
Pro Tips & Notes
To make sure your biscuit bombs turn out perfectly every time, keep these expert tips in mind.
Achieving the Ultimate Gooey Cheese Pull
- Use block mozzarella instead of pre-shredded cheese. Pre-shredded cheese contains anti-caking agents that prevent it from melting smoothly.
- Let them cool slightly before pulling apart. Cutting into them immediately may cause the cheese to ooze out too quickly.
Making Ahead for Parties & Events
- Prepare in advance: Stuff and shape biscuit bombs, then refrigerate them for up to 24 hours before baking.
- Bake right before serving: They taste best fresh, so plan to bake them just before guests arrive.
Flavored Dough Variations
- Garlic & Herb Dough: Mix garlic powder and Italian seasoning into the biscuit dough.
- Cheddar-Jalapeño Dough: Add shredded cheddar and finely diced jalapeños to the dough for extra flavor.
- Sweet & Savory Dough: Brush with honey butter for a slight sweetness.
Frequently Asked Questions (FAQs)
Can I make these with crescent roll dough instead of biscuits?
Yes! Crescent roll dough creates a lighter, flakier texture compared to biscuit dough. Simply cut the dough into squares, fill with cheese, and fold them into sealed balls before baking.
How do I prevent cheese from leaking out?
Make sure to pinch the edges tightly when sealing each biscuit bomb. Rolling them gently between your palms ensures there are no open gaps for cheese to escape.
Can I use different cheeses like cheddar or gouda?
Absolutely! While mozzarella provides the best gooey texture, you can experiment with cheddar, gouda, provolone, or a blend of cheeses for different flavors.
Are these good for meal prepping?
Yes! You can freeze unbaked biscuit bombs and bake them straight from the freezer by adding a few extra minutes to the baking time.
How do I make them crispier in an air fryer?
Use a light spray of oil on the tops before air frying. This helps create an even crispier crust while keeping the inside soft and cheesy.
What’s the best dipping sauce for biscuit bombs?
Marinara sauce is a classic choice, but garlic butter, ranch, sriracha mayo, and balsamic glaze all make excellent dipping options.
Can I stuff these with meat or veggies?
Yes! Try adding pepperoni, cooked sausage, sautéed mushrooms, or chopped spinach inside for a flavorful twist.
Conclusion & Final Thoughts
Gooey mozzarella biscuit bombs are an easy, crowd-pleasing snack that combines buttery, flaky dough with melty, stretchy cheese. Their versatility allows for endless variations, making them perfect for any occasion. Whether you’re serving them as an appetizer, side dish, or quick snack, they’re guaranteed to disappear fast.
Experiment with different cheeses, dough flavors, and fillings to create your perfect version of this cheesy delight. Once you try these, they’ll quickly become a staple in your recipe collection. Enjoy!

Gooey Mozzarella Biscuit Bombs
- Total Time: 30 minutes
- Yield: 8–10 servings 1x
- Diet: Vegetarian
Description
These Gooey Mozzarella Biscuit Bombs are crispy on the outside, soft on the inside, and bursting with melty cheese. They’re easy to make, customizable, and perfect for any occasion. Serve them as a snack, appetizer, or side dish with your favorite dipping sauce!
Ingredients
For the Biscuit Bombs:
- 1 can (8-count) refrigerated biscuit dough (or homemade biscuit dough)
- 8 ounces mozzarella cheese, cut into small cubes or use string cheese pieces
- 2 tablespoons butter, melted
- 1 teaspoon garlic powder
- 1 teaspoon Italian seasoning
- ¼ teaspoon red pepper flakes (optional, for a little spice)
- 2 tablespoons grated Parmesan cheese
For Dipping (Optional):
- Marinara sauce
- Garlic butter dip
- Ranch dressing
- Sriracha mayo
Instructions
Step 1: Prep the Dough
- Preheat your oven to 375°F (190°C). If using an air fryer, set it to 360°F (182°C).
- Separate the biscuit dough and gently flatten each piece into a 2-3 inch round.
Step 2: Fill & Seal the Biscuits
- Place one cube of mozzarella (or half a string cheese stick) in the center of each dough round.
- Bring the edges of the dough together and pinch to seal completely.
- Roll the sealed dough ball gently between your hands to ensure no gaps.
Step 3: Bake the Biscuit Bombs
- Place the sealed biscuit bombs seam-side down on a parchment-lined baking sheet or in a greased cast-iron skillet.
- Brush the tops with melted butter for extra crispiness.
- Bake for 12-15 minutes until golden brown and puffed up.
Step 4: Add Finishing Touches
- In a small bowl, mix melted butter, garlic powder, Italian seasoning, and red pepper flakes.
- Brush the hot biscuit bombs with the butter mixture as soon as they come out of the oven.
- Sprinkle with Parmesan cheese for added flavor.
Step 5: Serve & Enjoy!
- Let them cool for 5 minutes before serving.
- Serve warm with your favorite dipping sauce.
Notes
- Make-Ahead Tip: You can assemble the biscuit bombs and refrigerate them up to 24 hours before baking.
- Freezing Instructions: Freeze unbaked biscuit bombs on a tray for 1 hour, then transfer to a freezer-safe bag for up to 3 months. Bake from frozen, adding 3-5 extra minutes.
- Air Fryer Alternative: Air fry at 360°F for 6-8 minutes, flipping halfway, until golden brown.
- Cheese Variations: Try cheddar, provolone, or gouda for different flavors.
- Prep Time: 10 minutes
- Cook Time: 12-15 minutes
- Category: Appetizers
- Method: Air Frying
- Cuisine: American
Nutrition
- Serving Size: 1 biscuit bomb
- Calories: 190
- Sugar: 2g
- Sodium: 300mg
- Fat: 10g
- Saturated Fat: 5g
- Unsaturated Fat: 3g
- Carbohydrates: 18g
- Fiber: 1g
- Protein: 7g
- Cholesterol: 20mg


Leave a Comment